meme主题只支持目录显示在上方,如果是电脑访问,文章比较长就很不方便,我们自己修改为左侧。
通过查看源代码reuixiy/hugo-theme-meme,可以知道和目录相关的文件在meme主题的:/layouts/partials/pages/post.html
改动主题代码的时候注意,为了便于主题更新,目前推荐的方式是以 submodule 的形式加载主题。所以不要在主题文件夹下修改相应代码,应该直接在博客文件夹的根目录下,对应主题文件夹下相应的文件夹目录新建文件。也就是在下面所示的目录中新建文件(没有所示的文件夹请自建):
- ~/layouts/partials/pages/post.html
这样新建的文件可以覆盖主题文件夹下相同命名的文件,在下一次更新主题的时候不用重复修改主题文件。
 1
 2
 3
 4
 5
 6
 7
 8
 9
10
11
12
13
14
15
16
17
18
19
20
21
22
23
24
25
26
27
28
29
30
31
32
33
34
35
36
37
38
39
40
41
42
43
44
45
46
47
48
49
50
51
52
53
54
55
56
57
58
59
60
61
62
63
| <div class="post-layout">
{{/* 左侧目录块 */}}
{{ $enableTOC := .Params.toc | default .Site.Params.enableTOC }}
{{- if $enableTOC }}
<aside class="post-toc">
{{ partial "utils/toc.html" . }}
</aside>
{{- end }}
{{/* 原来的 <main> 原封不动拷进来 */}}
<main class="main single" id="main">
<div class="main-inner">
{{ $attrs := partial "utils/data-attributes.html" . }}
<article class="content post h-entry"
{{- with .Params.languageCode }} lang="{{ . }}"{{ end }}
{{- if $attrs.smallCaps }} data-small-caps="true"{{ end }}
{{- with $attrs.align }} data-align="{{ . }}"{{ end }}
{{- with $attrs.type }} data-type="{{ . }}"{{ end }}
{{- with $attrs.layout }} data-layout="{{ . }}"{{ end }}
{{- if $attrs.indent }} data-indent="true"{{ end }}
{{- if $attrs.tocNum }} data-toc-num="true"{{ end }}>
<h1 class="post-title p-name">{{ (partial "utils/title.html" (dict "$" $ "title" $.Title)).htmlTitle }}</h1>
{{ with .Params.subtitle }}
{{- $raw := . -}}
<div class="post-subtitle p-name">{{ partial "utils/markdownify.html" (dict "$" $ "raw" $raw "isContent" false) }}</div>
{{ end }}
{{ if .Site.Params.displayPostDescription }}
{{ with .Params.description }}
{{- $raw := . -}}
<div class="post-description p-summary">{{ partial "utils/markdownify.html" (dict "$" $ "raw" $raw "isContent" false) }}</div>
{{ end }}
{{ end }}
{{ if .Params.meta | default .Site.Params.enablePostMeta }}
{{ partial "components/post-meta.html" (dict "$" . "isHome" false) }}
{{ end }}
<div class="post-body e-content">
{{ partial "utils/content.html" . }}
</div>
{{ partial "components/post-copyright.html" . }}
</article>
{{ if and .Site.Params.enableGoogleAdUnits (eq hugo.Environment "production") }}
{{ partial "third-party/google-adsense-unit.html" . }}
{{ end }}
{{ partial "components/post-updated-badge.html" . }}
{{ partial "components/post-gitinfo.html" . }}
{{ partial "components/post-share.html" . }}
{{ partial "components/related-posts.html" . }}
{{ partial "components/post-tags.html" . }}
{{ partial "components/minimal-footer.html" . }}
{{ partial "components/minimal-footer-about.html" . }}
{{ partial "components/post-nav.html" . }}
{{ partial "components/comments.html" . }}
</div>
</main>
</div>
|
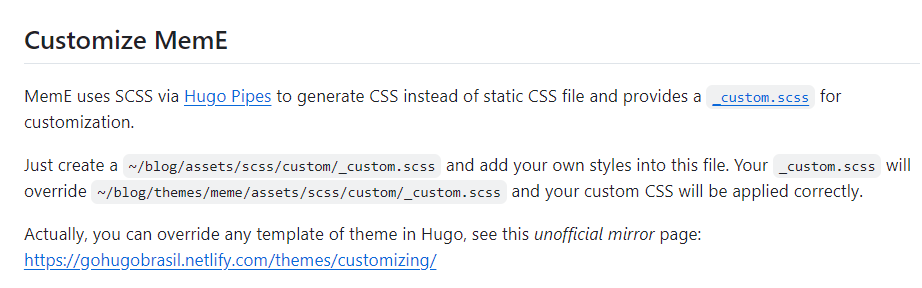
根据meme主题官方文档,我们需要修改css时,建议新建_custom.scss,在"~blog/assets/scss/custom/_custom.scss"
 1
 2
 3
 4
 5
 6
 7
 8
 9
10
11
12
13
14
15
16
17
18
19
20
21
22
23
24
25
26
27
28
29
30
31
32
| @media (min-width: 1025px) {
/* 目录列 = min-content(内容宽度),但最大 260px;空时自然为 0 */
.post-layout {
display: grid;
grid-template-columns: minmax(0, min-content) 1fr;
gap: 2.5rem;
max-width: 1200px;
margin: 0 auto;
padding: 0 1rem;
}
/* 限制目录本身最大宽度 */
.post-toc {
max-width: 260px;
position: sticky;
top: 2rem;
max-height: calc(100vh - 4rem);
overflow-y: auto;
font-size: 0.9375rem;
line-height: 1.75;
color: var(--color-contrast-high);
}
/* 正文区 */
.main.single { min-width: 0; }
}
/* 移动端隐藏目录,保持原样 */
@media (max-width: 1024px) {
.post-layout { display: block; }
.post-toc { display: none; }
}
|